Showing posts with label tarts/pies. Show all posts

Friday, December 10, 2010

Cheesy-Veggie Pie, with Salami, held together by Eggs and a Splash of Milk


Quiche? Frittata? Cheesy-veggie pie, with salami, held together by eggs and a splash of milk.

Whatever its called, its easy, I made it up, its healthy, its got pie crust.

And it's great leftover the next day.


Cheesy-Veggie Pie, with Salami, held together by Eggs and a Splash of Milk

1 recipe for pie crust
1 head of broccoli, cut into tiny bites
1 zucchini, sliced thin
8 slices salami
Cheddar cheese + this other amazing Spanish cheese that I had, too
6 eggs
splash of milk
salt and pepper

1. Make you crust. Refrigerate. Roll it out. Place into a pie plate or tart pan lined with parchment. Pre-bake your crust in a 400 degree F oven until just lightly colored, about 15-20 min.

2. Take your zucchini and salami and place along the bottom of the tart pan. Whisk together your broccoli, cheeses, and eggs with a splash of milk and salt and pepper. Pour into the tart pan over the salami and zucchini. Bake until done, about 30 min.

3. Let cool for about 5 minutes. Serve.


Monday, September 20, 2010

Fig Galette aka Figs in my Belly (For Real)


Once upon a time there was a dinner party. After dinner the guests ate dessert. A beautiful purple dessert. A purple dessert with a nice golden flaky crust. Warmed and topped with homemade vanilla bean ice cream. Now that's a dinner party!

Fig Galette in the making:

Oh, yes, and there was also a lovely yellow nectarine galette:


I used this recipe for my dough. For the fig galette, I spread the bottom of the dough with raspberry jam, topped it with my sliced fresh figs, and then sprinkled a touch of sugar over the top. Super easy, and the result is just gorgeous.

Thursday, August 26, 2010

Strawberry Rhubarb Pie


Strawberry rhubarb pie. Lovable lovable pie. Even my Comcast installation guy got to eat a slice of pie, lucky guy, eh? Let me warm you a slice and give you a scoop of my homemade honey vanilla ice cream. Or I can wrap you up a piece to go...How about some pie for breakfast with a nice mug of milky coffee?

One might ask, "how do you prevent this sought-after sweet treat to keep from getting soggy and overly juicy?" Quick-cooking tapioca does the trick. It is tasteless and helps the juicy berries and rhubarb from turning your pie into a messy ordeal. Quick-cooking tapioca is a thickening agent that helps the pie filling gel together. Some folks use cornstarch as an alternative thickener, however both myself and a few other food bloggers who I confirmed with agree that quick-cooking tapioca is the way to go.

(P.S. This is not my photo, nor is this my dog; image taken off of google images)

I made my pie in a tart shell pan, but you can also use a pie plate, it just depends on your preference. If you decide to use a tart shell pan, it is a good idea to cut out a circle of parchment paper and line the bottom of your pan with the parchment to ensure that your crust does not stick to the bottom of the pan.


Oh, and whatever you do, try not to eat the pie straight from the oven. Wait until the pie is COMPLETELY cool before you cut into it. Trust me, it is worth the wait. Otherwise, you will be sorry that you got sloppy messy slices of pie that are just not as pretty anymore.

So, let us begin our adventure in pie...


Tart and Pie Dough

from Alice Waters' The Art of Simple Food


Makes two 10-ounce balls of dough, enough for two 11-inch tarts or one double-crust 9-inch pie

Have measured:
1/2 cup ice-cold water

Mix together: 2 cups all-purpose unbleached flour 1/2 teaspoon salt (omit if using salted butter)

Add:
12 tablespoons (1 1/2 sticks) cold butter, cut into small (1/4-inch) cubes

1. Cut or work the butter into the flour with a pastry blender or your fingertips, leaving some of the butter in fairly large, irregular pieces. This will take 1 or 2 minutes. (Or mix for no more than a minute, at medium-low speed, in a stand mixer fitted with the paddle attachment.)

2. Pour in three quarters of the water, stirring all the while with a fork until the dough begins to form clumps. (In the mixer, turn the speed to low and pour the water down the sides of the bowl, mixing for 30 seconds or less.) Keep adding water if needed.

3. Divide the dough in two, bring each part together into a ball, and wrap each ball in plastic. Compress each ball, and then flatten them into disks. Let rest, refrigerated, for 1 hour or longer.


Strawberry Rhubarb Pie

from SmittenKitchen

1 recipe pie/tart dough (enough to make a double-crust pie) (recipe above)
3 1/2 cups (about 1 1/2 pounds, untrimmed) rhubarb, in 1/2-inch thick slices
3 1/2 cups (about 1 pound) strawberries, hulled and sliced if big, halved

1/2 cup granulated sugar
1/4 cup light brown sugar
1 tablespoon lemon juice
1/4 teaspoon salt

1/4 cup quick-cooking tapioca
2 tablespoons unsalted butter, cut into small pieces

1 large egg, beaten to blend with 1 teaspoon water or cream (for glaze)

granulated or raw sugar (for sprinkling)


Preheat oven to 400 degrees F. Take one of your dough disks out of the refrigerator and let it sit out for 15-20 minutes until it becomes malleable but not soft (it should still be fairly cold). On a well-floured counter, roll half of pie dough into a 12 inch round and carefully transfer to a 9-inch pie plate or tart pan. Place it in the refrigerator while you prepare the filling.

Stir together rhubarb, strawberries, sugars, lemon, salt, and tapioca in a large bowl. Mound the filling inside the bottom pie crust and dot with bits of unsalted butter.

Roll the second half of pie dough into an 11-inch circle and cut decorative slits in it. Transfer it to the center over the pie filling. Trim the top and bottom pie dough so that their overhang beyond the pie plate lip is only 1/2-inch. Tuck the rim of the dough underneath itself and crimp it decoratively.

Transfer pie to a baking sheet and brush beaten egg mixture over the dough. Sprinkle with sugar. Bake for 20 minutes, rotate the pie, then reduce temperature to 350 degrees and bake for an additional 25 to 30 minutes, until the pie is golden and the juices bubble visibly.

Transfer pie to a wire rack to cool. When full cool (several hours later or overnight) the juices gel.

**The pie should keep for up to three days at room temperature.


Thursday, August 5, 2010

Savory Summer Galette


Remember the blueberry and summer peach galette that I made last week? The recipe makes enough dough for 2 tarts, and since the dough is not sweet, it can be used for either (or in my case, both) sweet and savory tarts. When I was making my fruit tart, I stuck the other dough in the freezer for later use.

I used the second dough to make a savory galette, my filling consisting of pretty much whatever ingredients I had on-hand at the time at home. After rolling out my dough, I spread a thin layer of olive tapenade along the bottom. Then I chopped some red and yellow cherry tomatoes from the garden in half and added a touch of salt and pepper.


My next layer was tiny chopped pieces of zucchini, followed by some Parmesan cheese slivers and feta cheese cubes. I piled everything in the middle of my dough and drizzled a touch of olive oil on top for a nice finish.


This is like a pizza pie...but better (well, different...!).


You can use any vegetable or filling idea that you want! Try experimenting with different cheeses i.e. ricotta, a smoky gouda, soft goat cheese, a rich brie...Try caramelizing onions and adding walnuts and lemon zest. Maybe do a fig and honey galette. Or potato, fontina, pancetta, and rosemary. Yes, herbs! Basil, rosemary, oregano, parsley. Crack an egg of the whole thing and bake it up! Oo la la, the possibilities are endless.


Savory Summer (or whatever season it happens to be...) Galette

For the dough:
Use your dough from this recipe

Filling:
(note: measurements are just estimated here...cook with your gut)
-2 tablespoons olive tapenade
-2 cups of cherry tomatoes, sliced in half
-1 small zucchini, roughly chopped into tiny pieces
-salt and pepper
-3 tablespoons Parmesan cheese, shaved or grated
-4 oz. feta cheese, cubed
-extra virgin olive oil, for drizzling
-1 egg, lightly beaten

Let the dough warm up at room temperature for 15 minutes or so and preheat the oven to 400 degrees F. Roll out the dough on a lightly floured surface into a rough circle about 12 inches in diameter and about 1/8 inch thick. Transfer the pastry to a baking sheet lined with parchment paper and refrigerate while preparing the filling.

Prep all of your veggies and sprinkle them with salt and pepper. Take the dough out of the refrigerator and spread the middle with the olive tapenade, leaving a 1 1/2 inch border around the circumference of the dough. Pile your tomatoes and zucchini in the center on top of the olive tapenade. Sprinkle the Parmesan cheese and then the feta cheese on top. Drizzle a little olive oil over the filling.

Fold the dough over up over the filling, and brush the rim of the dough lightly with beaten egg.

Bake in the lower part of the oven for 45-50 minutes, until the cheese is lightly browned and the pastry is golden brown and slightly caramelized at the edges. Slide the tart off the pan to cool on a rack. Slice and serve!


Saturday, July 31, 2010

Blueberry and Summer Peach Galette with Homemade Vanilla Bean Ice Cream


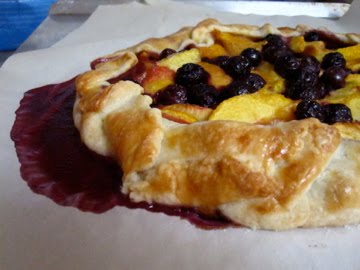
Oh baby, look at that oozing berry juice spilling out of the galette!!!!!!!!!!!!!!

Light, summery, refreshing, beautiful. This fruit galette is just heaven-- beautiful blues and purples from the blueberries and reds and orange colors from the peaches. The thin flaky crust serves as the perfect bed for the sweet juicy fruit. Paired with some dang good homemade vanilla bean ice cream, all I have to say is "mmm mmm mmm mmm mmm!"


A galette is a thin, free-form open-face tart. The dough is not sweet and can be used for savory tarts as well as dessert. Once you make the dough, the filling is your choice, pretty much anything goes.

...

...

...

...I am at a loss for words. Just make it, eat it, share it, enjoy it.


Blueberry and Summer Peach Galette

adapted from Alice Waters' In the Green Kitchen


6 to 8 servings

This recipe makes enough dough for 2 tarts. The dough will keep in the refrigerator for 2 days or in the freezer for several months

2 cups unbleached all-purpose flour
1/2 teaspoon salt (omit if using salted butter)
12 tablespoons (1 1/2 sticks) cold unsalted butter
1/3 to 1/2 cup ice-cold water

3-4 medium peaches
1 cup of blueberries
sugar
1 egg

If making the crust by hand: Measure the flour and salt (if including) into a bowl. The butter should be cold and firm, but not hard. Cut into 1/4-1/2 inch cubes and put about half of it into the bowl. Work it into the flour with your fingertips, lightly rubbing and breaking the flour-coated pieces of butter into small bits, until the mixture is roughly the texture of oatmeal or cornmeal. Add the rest of the butter and work it quickly into the dough until the pieces of butter are about half of their original size. Dribble the water into the dough while tossing the mixture with a fork. Keep adding water only until the dough begins to clumo and hold together when you squeeze a handful. You may not need the full 1/2 cup. Divide the dough into two and gather each part into a ball. Wrap each ball in plastic and flatten it into a disk. Let the dough rest, refrigerated, for an hour or so (I like to do it the night before...). You may want to freeze the second disk of dough for future use.

If you are using an electric mixer: Just follow the above directions but instead of using your fingers to incorporate the butter, use your fingers to turn on your mixer (use the paddle attachment).

When ready to make the tart: Let the dough warm up at room temperature for 15 minutes or so and preheat the oven to 400 degrees F. Roll out the dough on a lightly floured surface into a rough circle about 12 inches in diameter and about 1/8 inch thick. Transfer the pastry to a baking sheet lined with parchment paper and refrigerate while preparing the fruit.

Peel and slice the peaches (or whatever fruit you use) and toss with 1 to 2 tablespoons of sugar. I added blueberries to this, too. Freely pile the fruit in the center of the dough, leaving a 1 1/2-inch border of dough around the whole circumference. Fold the dough over up over the fruit, and brush the rim of the dough lightly with beaten egg. Sprinkle sugar over the dough and fruit; use more or less, depending on the tartness of the fruit.

Bake in the lower part of the oven for 45-50 minutes, until the fruit is tender and the pastry is golden brown and slightly caramelized at the edges. Slide the tart off the pan to cool on a rack. Serve warm or at room temperature--with softly whipped cream or homemade ice cream, if you like.


Some notes:

If you are using juicy stone fruits such as peaches, nectarines, apricots, and plums: to help absorb the juices sprinkle a mixture of 2 tablespoons sugar, 1 tablespoon flour, and 1 tablespoon ground almonds (optional) on the pastry before topping with the fruit.

Apple galette is delicious when you spread the rolled-out dough with apricot jam before arranging the apples on top. After baking, brush the apples with warm apricot jam for a beautiful glaze.


Friday, June 4, 2010

Buttermilk Pie With Warm Berry Sauce


Get ready. This pie is the real deal. It all begins with the crust, and WOW is this a crust. Butter + buttermilk +a little flour, sugar, salt.
Uh. Yeeeeaa. And it doesn't stop there...the filling entails more butter, more buttermilk, and a little bit of love. Drizzled (or in my case, slabbed on...) with a hearty tinge of berry sauce (heat jam + a bit of liquor), it all seems to good to be true.


Actually, I especially liked the pie the following day after it had been in the refrigerator all night; all of the flavor really got to settle in and it was nice and cold--it seemed more like a cheesecake this way.


Over the years, my math skills have gone down the drain, and I was never that great at geometry to begin with. One of the most difficult tasks for me now as a baker is cutting a tart or pie into even pieces. In a professional food setting, I would have to plate every slice of pie exactly the same size. Your average tart or pie would probably be cut into 9 slices. 9 is a tough number. I have to draw a diagram so that I remember how to cut. Finding the center is also very challenging for me. For tarts baked in a tart pan, I have also resorted to counting the number of ridges per slice (8-9 ridges equal one slice). Goodness, I have a headache now!


When I am in a more casual setting, I just let everyone slice for themselves
(or, if I am the one slicing, I just do a rough eyeball). I don't need anything fancy (In my family, we tear our bread loaves rather than slice; it's just more fun that way). There are always those who just want a little sliver of pie, and those who want a slice the size of my head, so I just stand back and let them do their thing.


Anyhoot, this pie is so rich that it feels so light. I'm kind of floating right now (or maybe I just have too much CA sunshine running through my veins). Either way, come on over for a slice of pie, it's my treat.


Buttermilk Pie with Warm Berry Sauce

recipe from Joythebaker.com


Buttermilk Pie Dough


2 sticks (8 ounces) cold unsalted butter

2 1/2 cups all-purpose flour

1 Tablespoon sugar

1 teaspoon salt

1/2 cup buttermilk, cold


Cut butter into 1 inch pieces and place in the freezer to chill for 15 minutes.


Sift together the flour and sugar into the bowl of a stand mixer fitted with a paddle attachment. Sifting eliminates lumps and aerates the mixture, making the dough tender and lighter. Add the partially frozen butter and the salt. Mix on low speed for 2 minutes, or until the butter is reduced to the size of broken walnut meats. Stop the machine and by hand pinch flat any large pieces of butter that remain.


Turn the mixer on low speed and add the buttermilk all at once. Mix until the dough comes together, about 15 seconds. The dough should be tacky, but not sticky, and still rather shaggy.


Remove the dough from the bowl and quickly form into a rough disk. Wrap in plastic. Try not to overwork the dough. Chill for at least 1 hour before rolling out. At this point the dough will keep in the refrigerator for up to 3 days or in the freezer for up to 3 weeks. For freezing roll the dough into sheets and wrap them in airtight plastic film first.


Roll the dough out into about 1/8th inch thickness. Transfer to a pie plate and stick in the freezer (or fridge) while you prepare the filling.


Buttermilk Filling


3 large eggs

1 cup sugar

2 Tablespoons all-purpose flour

1 stick melted butter, slightly cooled

1 cup buttermilk

2 teaspoons pure vanilla extrct

1 unbaked 9-inch pie shell


Beat eggs slightly. Mix sugar and flour well and add to the eggs. Mix until creamy. Add melted butter, mixing well. Add buttermilk and vanilla extract. Bake at 325 degrees F for 45 minutes to 1 hour (my pie took about 1 hour and 15 minutes) until the custard sets. Tip: the custard will still jiggle a bit in the oven even when it's set. Just make sure that the middle does not jiggle a lot more than the sides. That means it needs more time.


Berry Sauce


1/2 cup berry preserves (I used raspberry jam p.s. it had seeds, which I like because it adds a fun little crunch. If you prefer seedless, by all means go seedless!)


1 Tablespoon Chamborde liqueur, also considered orange liqueur or a bit of Triple Sec


Pour the preserves in a saucepan and arm on medium heat, stirring constantly with wire whip until smooth. Remove from heat and add liqueur. Let cool slightly and drizzle over pie.


**Just a shout-out to Joy: After hours and hours spent baking her recipes and perusing her blog, I decided to start my own blog a year ago. She has truly been an inspiration for my baking, my writing style, and my sense of well-being. I thank you again and again and again Joy! (Below is a photograph of Joy, on the right, and myself at a roof-top picnic that she put together for her and her fellow blogging friends/readers last year.)

Thursday, April 1, 2010

Almond Frangipane and Blackberry Jam Tart


For a while now, frangipane has been a big mystery to me. I often dip my finger in a batch at my work (shh, don't tell) and shiver with satisfaction. I have tasted frangipane many times, and I know it has almond in it, but what else? How does one make it? I thought it had liquor in it, but nope (although...a little dash might be nice). Just your good ol' fashioned butter, egg, sugar. Seriously, who needs anything else in life?

Why do they call it frangipane? Well, I'm still not quite sure. Apparently the word is derived from frangere il pane (Italian for "break the bread"). What this has to do with one of the most divine almond tarts ever tasted? Still a mystery to me.

In just the tiniest bite of this Almond Frangipane and Blackberry Jam Tart, I can taste it all. BUTTER, ALMOND, BLACKBERRY, LOVE.

This tart is very versatile. I can see it served during the cold winter months as well as the springtime (Easter brunch dessert?!). You can change up the jam to whatever suits your fancy.

At my work, we use frangipane in our tarts and puff pastry turnovers. In addition to almond, we like to mix it up and use other nuts and flavorings (hazelnut is dreamy!).


Just make this. Indulge. Love it.

Almond Frangipane and Blackberry Jam Tart


adapted from SmittenKitchen

1 recipe's worth of sweet tart dough, pre-baked in a 9-inch removable tart pan

1 cup coarsely chopped almonds, blanched if you can find them
1 1/2 tablespoons all purpose flour
2/3 cup sugar
9 tablespoons (1 stick plus 1 tablespoon) unsalted butter, at room temperature
1 large egg
1 large egg white
1/2 teaspoon almond extract
1 1/2 teaspoons orange zest (not traditional, but just lovely in there)
1/3 cup jam (I used blackberry)
Slivered or sliced almonds, for garnish (optional)


Finely grind almonds and flour in processor. Mix in sugar, then butter, extract and orange zest. Blend until smooth. Mix in egg and egg white. Transfer filling to medium bowl. Cover and chill at least 3 hours.


Position rack in center of oven and preheat to 350°F. Spread jam over base of tart shell. Dollop the almond filling all over, then spread it carefully with an offset spatula. If using slivered or sliced almonds as garnish, sprinkle them over the top now. Bake tart until golden and tester inserted into center of filling comes out clean, about 45 minutes. Cool tart in pan on rack.


To serve, push pan bottom up, releasing tart from pan. Cut tart into wedges and sprinkle with powdered sugar, if desired.


Do ahead: Almond filling can be made 2 days ahead. Keep chilled. Whole tart can also be made half a day in advance. Let stand at room temperature.


Thursday, March 11, 2010

Yay for Vegemetables!


Yay for Vegemetables! The spring season is almost upon us! This means peas and favas and fennel oh my! This means asparagus and rhubarb, strawberries and pineapple, and ma ma ma mango!


It's almost spring. It's time to lighten up. It's time to soak up some sunshine and frolick in the park and wear hats and flowy dresses. Polka dots and flowers and bright colors and patterns. Frisbee and baseball and dachshund derbies!

It's mating season--for the squirrels, for the birds, and well, for us humans.

All I want to do is sip on mimosas and dance in the streets and have someone whisper sweet nothings in my ear.

When I think of spring, I think light. I think fresh smells. I think of color. And this is exactly what I think about when I want a nice spring meal. Something not too heavy (simple simple simple), something fragrant and filled with fresh herbs and flavors (fresh basil, chives, rosemary...), and something bright green and red and orange and white.


And now I present you with two beautiful spring recipes highlighting the essence of simple, fresh, and, well...springy!

Barefoot Contessa's Back to Basics has a great recipe for roasted vegetables--fennel, fingerling potatoes, thin French green beans, and asparagus. You just need a splash of oil, a sprinkle of salt and pepper, and a few dashes of Parmesan. Done. Perfect. Gorgeous. TASTY TOWN!

Next I have for you a lovely galette, a free-form tartlette. Filled with the last of the sweet winter squash and spiked with the fresh hint of green spring basil and purple shallots. I'm licking my lips. My tummy is thanking me.


So, let's get cookin':


Oven-Roasted Vegetables a la Barefoot Contessa

serves 6

2 small fennel bulbs, tops removed
1 pound fingerling or small potatoes
1/3 cup good olive oil
Kosher salt and freshly ground black pepper
1 pound French string beans (haricot verts), trimmed
1 bunch thin asparagus, ends removed, cut diagonally into 3-inch pieces (I just left mine whole)
1/4 cup freshly grated Parmesan cheese (omit if making this for vegans)

Preheat oven to 425 degrees.

Cut the fennel bulbs into 6 wedges each, cutting through the core to keep the wedges intact. Place on a sheet pan. Cut the potatoes in half lengthwise and place them on the pan with 2 teaspoons salt and 1 teaspoon pepper. Toss with your hands.

Roast the vegetables for 25-30 minutes, until potatoes are tender, tossing once while cooking. Toss the string beans and asparagus with the roasted vegetables and roast for another 10-15 minutes, until the green vegetables are tender. Sprinkle on the Parmesan cheese and roast for another minute or two until the cheese melts.

Sprinkle with salt and pepper and serve hot.


and now...

BUTTERNUT SQUASH GALETTE
Adapted From Doable and Delicious
Originally From Gourmet Magazine February 2009

For the dough:
1 1/4 cups all purpose flour

1 stick cold unsalted butter, cut into 1/2 inch cubes (I used Earth Balance spread to make this vegan)

1 tbsp fresh basil leaves, cut into a chiffonade

1/2 tsp sea salt

4 tbsp ice cold water

Dough: Pulse flour, butter, basil, and sea salt in a food processor until mixture resembles coarse meal. Drizzle ice water evenly over mixture and pulse until it just forms a ball. Do not overwork dough or pastry will be tough. Gently press dough into a 5 inch disk and chill, wrapped in plastic warp, until firm, at least 1 hour.

For the filling:
2 lb butternut squash, peeled, seeded and cut into 2 x 1/4 inch slices

1/2 tsp sea salt

3 tbsp olive oil, divided

A few shallots, sliced thinly

6 ounces soft mild goat cheese, crumbled (omit if making this tart vegan)

extra:
1 egg, lightly beaten (omit if making this vegan)

more fresh basil, chiffonaded, for garnish

Preheat oven to 500 with rack in the middle.

Toss squash with sea salt and 1 tbsp oil and arrange in 1 layer in a shallow baking pan or cookie sheet. Roast, stirring once halfway through roasting, until golden brown on edges and undersides, 20 to 25 minutes. Remove squash from oven and reduce oven temperature to 375.
Meanwhile, cook the shallots in remaining 2 tbsp oil with a pinch of salt in a skillet over medium heat, stirring occasionally, until tender, 6-10 minutes.

Roll out dough into a 13 inch round on a lightly floured surface. Transfer to a baking sheet (lined with parchment) or pizza stone. Arrange the squash, shallots, and goat cheese and fill the galette in an even layer in center of dough, leaving a 2 to 3 inch border. Fold dough in on itself to cover outer rim of filling, pleating dough if necessary.

Brush pastry with beaten egg (omit if making this vegan) and bake galette until crust is cooked through and golden on edges, 35 to 45 minutes. Cool on baking sheet on a rack 10 minutes before serving. Garnish with fresh basil.

Wednesday, January 20, 2010

Thumbprint Cookies


Today I woke up when it was pitch black, the wind was howling, and pouring sheets of rain managed to break my umbrella. As my day progressed, I sat down on a chair and some sharp object of destruction crept up on me and ripped a hole in the derriere of my jeans. Later, I sloshed through a grove of wet, sticky mud which managed to get all over my rain boots (at least this can wash off).

I walked home up a bazillion steep hills while carrying 3 huge textbooks, a messenger bag, an extra coat, and a wet, broken umbrella. After shoving mounds of chocolate chips down my throat and collapsing onto my cushiony desk chair in my warm house, I feel slightly better. Slightly.

Thumbprint cookies. Reminiscing about these thumbprint cookies makes me feel a bit better, too. I made these back down in sunny Los Angeles just before I drove back up to rainy Berkeley. Don't get me wrong, I absolutely LOVE being back in Berkeley, I could not be happier, but today is just one of those days.

Whether it is sunny or rainy, snowy or hail-y, these cookies with hit the spot.


When making thumbprint cookies, you literally push your thumb into the ball of dough, making a small indent that cannot wait to be filled with goodness!

And guess what? This dough is exactly the same dough that I used to make my apple tart! It's like when you see a spread in a magazine where the same skirt or jacket can be worn for work, weekend, and a night-out-on-the-town. Crazy, I know, but true. Even though I used the same dough recipe, I can really taste a harder, crumblier tart shell crust in my apple tart and a softer, chewier, cakier cookie dough in the thumbrpint cookies. Isn't it amazing how different the same thing can turn out when paired with something new?!


And the best part? I get to fill these babies with anything I want! Not only have I been on a Meyer lemon kick lately, but Nutella is now my new obsession. So, I chose to do variety of fillings--Meyer lemon curd (homemade of course), Nutella (the store-bought kind of course), and I threw in some fig/walnut jam as well as some strawberry jam. Mmmm mmm mmm now I can have one of each because of course, I must taste them all!


And look, this Nutella one came out looking like a little Hershey's kiss, cute!


Thumbprint Cookies
(NOTE: this is the same "Sweet Tart Dough" used to make my apple tart)

makes about 30 cookies

Beat together until creamy:
8 Tablespoons (1 stick)
1/3 cup sugar

Add and mix until completely combined:
1/4 teaspoon salt
1/4 teaspoon vanilla extract
1 egg yolk

Add:
1 1/4 cups all-purpose unbleached flour

Mix well, stirring and folding, until there are no dry patches. Chill for a bit, maybe 3o minutes to an hour.

Preheat the oven to 350 degrees F.

Take your dough out of the refrigerator and roll into little balls about the size of a large walnut in its shell (1-inch?). Fill a shallow bowl or plate with about 1/2 a cup of:
granulated sugar

Roll each ball into the sugar.

Press your thumb gently into the top of each ball until a small indent forms. Bake for 12 minutes, remove from the oven, and fill the indents with:
lemon curd
or
jam (If using Nutella or chocolate kisses, wait)

Bake for another 5 minutes, or until light and golden. Let them cool. Now you can fill them with:
Nutella (I just plopped some in with a spoon)
or
Hershey's kisses

Thursday, December 31, 2009

Apple Tart


The very first thing I made with my new standing Kitchen Aid mixer was a batch of tart shell dough. I made the dough, wrapped it up, and stuck it in the freezer for "emergencies."

I brought my dough over to Linda's house yesterday because I thought we might want something more to play with! We rolled out the dough and placed it in a tart shell. We spread the shell with a layer of wild plum jam and then we layered apples from her apple tree in concentric circles around the tart, but first we tossed the apples with a bit of sugar, lemon juice, and cinnamon. We made sure not to add too much sugar because we liked the balance of the sweet crust with a nice tart apple. To top it all off, we sprinkled some raw (turbinado or demerara) sugar over the tart. This gave the tart a nice little crunch of sweetness!


I think this may be one of the best apple tarts that I have EVER tasted. Seriously. Not too sweet, but just sweet enough. The crust is perfect. And the apples are so thin and pack a punch full of flavor! Oh, and I absolutely love the combo of the wild plum jam with the apples. Mmm mmm mmm!

Now, laying your tart dough in the pan can be pretty tricky. My goal is to do it like snow white. Even after doing it over and over at work, I still have trouble. Your dough may break here and there, but the dough is pretty malleable and you can just patch things up where you need.


Sweet Tart Dough
from Alice Waters' The Art of Simple Food

makes enough for one 9-inch tart or six 4-inch tartlets, or 30 cookies (you can make thumbprint cookies!)

Beat together until creamy:
8 Tablespoons (1 stick)
1/3 cup sugar

Add and mix until completely combined:
1/4 teaspoon salt
1/4 teaspoon vanilla extract
1 egg yolk

Add:
1 1/4 cups all-purpose unbleached flour

Mix well, stirring and folding, until there are no dry patches. Chill at least 4 hours or overnight until firm (you could probably just chill for 1 hour and be fine). Or, freeze. Just be sure to defrost for a few hours before ready to use.

Fun variations:
-mix 1 teaspoon of cinnamon into the flour
-substitute some of your all-purpose flour with cornmeal


Apple Tart
invented

1 Sweet Tart Dough (optional: you can pre-bake your shell for 10-12 minutes, but it is not necessary)

Wild plum jam, or any jam of your choice
Apples from Linda's tree (or any good baking apple), peeled and sliced thinly
Cinnamon, a few pinches
Sugar, maybe 1 1/2-2 Tablespoons
Lemon juice, maybe 1 Tablespoon

Optional: raw (turbinado or demerara) sugar for finishing

1. Preheat oven to 350 degrees F. Lightly oil your tart pan.

2. On a lightly floured surface, roll your tart dough into a 12- inch disk. Carefully transfer to the tart pan.

2. Spread with a layer of plum jam.

3. Combine your apples, cinnamon, sugar, and lemon juice. Arrange over the dough in concentric circles.

4. Sprinkle with raw/turbinado sugar.

5. Bake for about 40-50 minutes. If your edges start to brown, cover with foil and continue baking.

6. Cool and take your gorgeous tart out of the pan. Serve warm with ice cream, coffee, or on its own.